Thursday, 6 July 2017

nrf51 - dk with arm gcc and ubuntu

Recently i bought the nrf51-dk. it consist of nrf51422 SoC which is similar to nrf51822SoC without ANT protocol. nrf51822 is the BLE4.2 SoC. i am trying my luck with beacons.
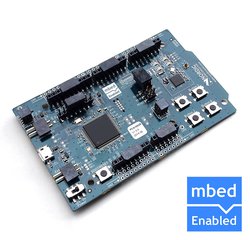


nrf51822 is mbed enabled i.e  we can program it using mBed online compiler and nordic also provides support for following development options.

 1. Keil uVision - most of nordic official document comes with Keil example's.
 2. IAR 
 3. ARM GCC 

In this post i will cover arm gcc setup using nordic command line tools  on linux (ubuntu) to compile and flash the given examples.

watch the video of total procedure here


1.Download the required softwares from Nordic  here (look under Downloads)
          a. nRF5-SDK
          b. nRF5X-Command-Line-Tools
2. GNU ARM Embedded tool chain from  here

3. Segger JLink Software from here

 install the segger jlink software using command

sudo dpkg -i segerJlinkFile.deb

it will be installed under /opt/segger

 sdk,command line tools and gnu arm tools chain comes as .tar packages. untar them and place them in directory.

go to your arm gcc tool chain folder

 cd <ARM_GCC_FOLDER>
ls

you can find following folders

arm-none-eabi  bin  lib  share

 add the bin folder to the path

PATH=$PATH:<ARM_GCC_TOOLCHAIN>/bin


go to your SDK Folder and cd into the

cd <SDK_PATH>/components/toolchain/gcc

and change the Makefile.posix  to the following 

GNU_INSTALL_ROOT :=<ARM_GCC_FOLDER>
GNU_VERSION := 4.9.3
GNU_PREFIX := arm-none-eabi


then go to the blinky example

cd  <nRF5_SDK>/examples/peripheral/blinky
ls

 blinky.eww  hex  main.c  pca10028  pca10031  pca10040  pca10056

main.c consist of the instructions pca100xx consist of make file and link files for different versions of dk boards. i am having the pca10028.

cd pca10028
ls

blank  s130

s130 is the softdevice implementation. softdevice is the precompiled hex files which consist functions of ble and ant api's.

we are not using soft device

cd blank
ls


arm4  arm5_no_packs  armgcc  config  iar


these are different implementation options. we are using armgcc

cd armgcc
ls

blinky_gcc_nrf51.ld  Makefile
we use make file to compile the main.c and generate .hex file. use command make to do that.

make

  you will get following on terminal

 mkdir _build
Compiling file: nrf_log_backend_serial.c
Compiling file: nrf_log_frontend.c
Compiling file: app_error.c
Compiling file: app_error_weak.c
Compiling file: app_timer.c
Compiling file: app_util_platform.c
Compiling file: hardfault_implementation.c
Compiling file: nrf_assert.c
Compiling file: sdk_errors.c
Compiling file: boards.c
Compiling file: nrf_drv_clock.c
Compiling file: nrf_drv_common.c
Compiling file: nrf_drv_uart.c
Compiling file: nrf_nvic.c
Compiling file: nrf_soc.c
Compiling file: main.c
Compiling file: RTT_Syscalls_GCC.c
Compiling file: SEGGER_RTT.c
Compiling file: SEGGER_RTT_printf.c
Assembling file: gcc_startup_nrf51.S
Compiling file: system_nrf51.c
Linking target: _build/nrf51422_xxac.out

   text       data        bss        dec        hex    filename
   3120        112        112       3344        d10    _build/nrf51422_xxac.out

Preparing: _build/nrf51422_xxac.hex

Preparing: _build/nrf51422_xxac.bin
 

_build/nrf51422_xxac.hex file will flashed to the board. to flash the board nrfcommand line tools are used. go to the command line tools directory

cd  <NRF_COMMAND_LINE_TOOLS>
ls
 nrfjprog mergehex

add the nrfjprog to the path

PATH=$PATH:<NRFJPROG_DIRECTORY> 

and use the following command to flash the device

nrfjprog --family nrf51 --program _build/nrf51422_xxac.hex

after flashing you need to reset the board. use the following command to reset board


nrfjprog --family nrf51 -r

makr some changes in the main.c file and you can reflash the dk. 

to erase the pre flashed code  we command

nrfjprog --family nrf51 -e

clean the build and build again

make clean
make 

then flash and reset again

 nrfjprog --family nrf51 --program _build/nrf51422_xxac.hex


nrfjprog --family nrf51 -r

Friday, 25 November 2016

nodemcu Flash Error

Green Led Blinking Continusly

http://www.esp8266.com/viewtopic.php?f=22&t=11431

and curiously i didnt solve my problem..
and i started tinkering with flash baudrate and when i set it to 115200 it is avoided.

Wednesday, 21 September 2016

Sending the sensor data from NodeMcu to the Remote Database

little NodeMcu board is packed with so much fun.. I recently done project which reads data from Three sensors and sends them via post request to the webpage. a simple php script  which reads the variables sent via post request and stores them in mySql data base. it is more like my Previous project
raspberry pi Local Server but here we are actually posting the data to the web.

In NodeMcu part :

to connect the nodemcu to the wifi we use

    wifi.setmode(wifi.STATION)
    wifi.sta.config(_ssid,_pswd)
    wifi.sta.connect()


and to send the data to database

http.request("http://pamda1ver2.16mb.com/sensorData.php", "POST", "Content-Type: application/x-www-form-urlencoded\r\n",data,
  function(code, data)
    if (code < 0) then
      print("HTTP request failed")
    else
      print(code, data)
    end
  end)

In server side :

//Create Connection
$conn = new mysqli($serverName,$userName,$password,$db);
if($conn ->connect_error){
 die("Connection Failed: ".$conn->connect_error);
 }
echo "Connected successfully";

$sql = "INSERT INTO sensorData(time, ldr, humi,temp,mois)
VALUES ( date('Y/m/d H:i:s'),$ldr,$humi,$temp,$mois)";

is used to read the data and store them in mySQl database


and

//Create Connection
$conn = new mysqli($serverName,$userName,$password,$db);
if($conn ->connect_error){
 die("Connection Failed: ".$conn->connect_error);
 }
echo "Connected successfully";
$retval = mysqli_query($conn,"SELECT * FROM sensorData");

if(!$retval){
 die('Could not get Data : '.mysqli_error());
}

is used to read the values from database and display

you can see the result http://pamda1ver2.16mb.com/padma.php

and get the all source code from https://github.com/anilkunchalaece/lLabBasic


Monday, 8 August 2016

Arduino GPS Tracker with OLED Display and Bluetooth

I done this Project using
1. Adafruit 1.27" Oled Breakout Board https://www.adafruit.com/product/1673
2.Adafruit Ultimate GPS https://www.adafruit.com/product/746
3. HC - 05 Bluetooth Module - 2 no's
4. Arduino Uno - 2 no's
and Some Jumper Wires..

By using Adafruit Libraries for Respective Devices with Little Coding  I made this


Tuesday, 2 August 2016

Sockets in NodeMCU with Lua

I started this project with Php Socket Server and NodeMcu Lua Client in Mind.. But i have hardtime getting it working.. So I replace the Php socket server with Python Socket server running in raspberry pi

So I used the Python Socket Server running in the Raspberry pi and NodeMcu with Lua as socket Client using port 12346 in Intranet.

 NodeMcu Side 
I Normally used REPL (Read Evaluate and Print Loop) to send the Commands than Execute it as File.

Configure your wifi in station mode
               wifi.setmode(wifi.STATION)

connect to access point
                                 wifi.sta.config("SSID","PASSWORD")
               wifi,sta.connect()
               ip = wifi.sta.get.ip()

use print(ip) to print the ip of your nodeMCU. if it returns NULL, then use
                               print(wifi,sta.status())
it will return number from 0 -5
0 - STA_IDLE
1 - STA_Connecting
2 - STA_wrong Password
3 - STA_AP Not Found
4 - STA_FAIL
5 - STA_GOT_IP

Normally it will take couple of seconds to connect the Access Point. So the return value will be 1 after couple of seconds you will get 5.

To create the Socket connection we can use built-in module name net
                                        sk=net.createConnection(net.TCP, 0)
this will create the TCP socket client and return the handler which is assigned to sk
                                      sk:on("connection", function(sck,c)
                     sk:send("HELLO")end)
it is used to specify the callback function when the connection is established
same goes for receive and send also

finally .. sk:connect(12346,"192.168.1.199") is used to connect the socket

You can find the all source Code on My Github Repositories https://github.com/anilkunchalaece/NodeMcuLuaSocketwithPython

Friday, 29 July 2016

Hello World with NodeMcu using Lua

I recently come across a another Prototyping Board named as NodeMCU.
From its Official Website Node MCU is
An open-source firmware and development kit that helps you to prototype your IOT product within a few Lua script lines

It runs on Low Cost ESP8266 SoC from Espressif.. and Open Source NodeMCU firmware. We can Program this module using lua,micropython and c. 

First thing to do after you gets your hands on your nodeMCU hardware is to flash new firmware to it..  there are still people working on it.. so it is best to keep it updated.

To flash firmware you need(I am assuming you have nodeMCU Dev Kit with you not generic esp8266 Module)

1.  cp2102 usb to Serial Bridge Drivers  : Download from https://www.pololu.com/docs/0J7/all
2.  Node MCU firmware :  Go to https://github.com/nodemcu/nodemcu-firmware/releases
and Download the nodemcu_float or nodemcu_int

3. NodeMCU Flasher : Download it from https://github.com/nodemcu/nodemcu-flasher
 
 Download the win32 or win64 depending on your system

4.ESPlorer IDE to Program Node Mcu : download it from  http://esp8266.ru/esplorer/ and make sure you have java installed in your system


step 1: Install the cp2102 Driver
step 2: Connect the your nodeMCU board to your PC and note down the COM port
step 3: open the NodeMCU flasher Downloaded earlier
ans select the nodeMCU COM port under operation Menu

step 4: under the config tab select the downloaded nodeMCU firmware by clicking little gear as shown in the image
step 5: go back to the Operation Menu and Click on the Flash Button.. 
You can see the Progress below or go to the log for Messages..

You can see the green tick mark in the NODEMCU TEAM when it us successfully updated the firmware.

step 6: close the flasher application and remove and reinsert power to nodeMCU

Now.. your nodeMCU is ready to accept commands from you

Simple LED On and Off using lua
there are many loaders available for nodeMCU.. i am using ESPlorer which runs on Java

Open the ESPlorar.jar executable program in previously downloaded package

 
 Select the COM port and click Open You can now see that Lower send Button is Activated..

You can send the commands to the nodeMCU using send followed by Command.

The command used are 
1. gpio.mode(pin,mode) : used to set the mode for GPIO pin

mode can be specified as input or output using gpio.INPUT or gpio.OUTPUT

2.gpio.write(pin,value) : used to send low or high value to the pin

value can be specified as gpio.LOW or gpio.HIGH for low or HIGH values

I will use pin 7 (D7), Connect the Anode to D7 and cathode to ground with help of breadboard 

and send the following commands to the nodeMCU one by one (anything followed by " -- " is Comment )

gpio.mode(7,gpio.OUTPUT)
gpio.write(7,gpio.HIGH) -- LED is ON 
gpio.write(7,gpio.LOW) -- LED is OFF

That's it for Now...

Saturday, 2 July 2016

RasPi Local Web Server, Database and Posting Data From Arduino To Server

In this Post I will Show How to Setup Local Server , Data Base,Phpmyadmin to Receive the Data from Arduino Master Which is Receiving Data From Other 3 Slave Arduino's
Basic Setup :


First Work On the Arduino Part:
I used I2C Protocol To establish Master Slave Communication Between Arduinos.
Master Arduino Sends the request to the slave for Data For three Arduinos 
newMillis = millis();
if(newMillis - prevMillis >= interval*1000){
prevMillis = newMillis;
requestSlaveA();
delay(100);
requestSlaveB();
delay(100);
requestSlaveC();
}

On Slave Side Upon Receiving Request
void requestCallback(){
int input = analogRead(AnalogInputPin);
// To send multiple bytes from the slave,
// you have to fill your own buffer and send it all at once.
uint8_t buffer[2];
buffer[0] = input >> 8;
buffer[1] = input & 0xff;
Wire.write(buffer, 2);
}


Slave Reads the Value from Analog 0 Pin and Convert the Int into byte with Shifting and "Logical AND" Operation ans Send the value to the Master.
On Master Side The Request Function is Like this:
void requestSlaveA(){
if(Wire.requestFrom(slaveA,byteLength)){
Serial.print('A');
Serial.println(getData());
}else{
Serial.println("EA");
}
}

From Nick Fammon Site : Wire.requestFrom does not return until the data is available (or if it fails to become available). Thus it is not necessary to do a loop waiting for Wire.available after doing Wire.requestFrom.

Upon receiving the Data we call the getData() Function to Parse the Data
int getData(){
int receivedValue = Wire.read() << 8;
receivedValue |= Wire.read();
return receivedValue;
}

we Sent the Parsed data Via Serially To the Raspberry Pi.
On Raspberry Pi Side I Used Python to Receive the Data Serially and Regular Expressions with Python for
Parsing Data

ser = serial.Serial('/dev/ttyACM0') #open the serial Connection between pi and Arduino
while True:
if(ser.inWaiting() > 3) : #If Serial Buffer has More than 3 Bytes
data = ser.readline() # read a Line of Data from Serial Buffer
processData(data) # Call the Function to Read the Data

This Code Receives the Data Serially and call function processData() to Process the Received Data and Pass the Data as Argument.

So we Received the Data. We need to Setup Raspberry pi as Server and Setup Database in to it.
For that Follow these Steps :

1.To Install Apache2 in Raspberry Pi use the Command ;
sudo apt-get install apache2 php5 libapache2-mod-php5
2.After Finished Installing Use the Following Command to Restart the apache2 Server
sudo service apache2 restart
3.After Restarting Check your Pi Ip Configuration with Command
ifconfig
4.Enter the ipNumber in the Web browser in locla lan. you can see Sample Webpage as
It Works
You can Edit the source file Location using
sudo nano /var/www/html/index.html note : You need to Change the Above file before Using It

5.Installing Php5 In Raspberry Pi : use the following command to install the Php
sudo apt-get install php5 libapache2-mod-php5 -y
6.Installing My Sql on Raspberry Pi : Use the Following Command to Install The mySql
sudo apt-get install mysql-server python-mysqldb This will install the mysql server and Python MySQLdb Module Also

7.Installing Php My Admin : use the following Command to Install the Phpmyadmin
sudo apt-get install phpmyadmin
8.Configure Apache2 to Work with Php My Admin
nano /etc/apache2/apache2.conf
naviagate to the Bottom of the File and add the Following Line
Include /etc/phpmyadmin/apache.conf

9.restart the apache2
/etc/init.d/apache2 restart
Before Running the Code create a Database in the SQL using Terminal
To enter in to the mysql shell enter

mysql -u root -p where root is the username
use the Command
                        a.CREATE DATABASE database_name to Create a Database
                        b.USE database_name to change the current database
                        c.CREATE TABLE table_name To Create a table in the Current Database

I used Python MySQLdb Module to Write the values Into MySQL data base
To Store the Values into the DataBase Use 
db = MySQLdb.connect("localhost","root","raspberry","sensorData") #Connect to the DataBase 
curs = db.cursor() # open Cursor which is used to pass MySQLdb Queries
curs.execute(""" INSERT INTO sensorData.sensorDataTable values(%s,%s,%s,%s)""",(deviceId,timeStamp,1,sensorValue)) #Commit the Data db.commit()

Which stores the Values in the DataBase


To Read the Values from mySQL Database to WebPage I used Php
$conn = new mysqli($serverName,$userName,$password,$db); 
if($conn ->connect_error){ 
die("Connection Failed: ".$conn->connect_error);
 } 
echo "Connected successfully";
 $retval = mysqli_query($conn,"SELECT * FROM sensorDataTable");
 if(!$retval){ 
die('Could not get Data : '.mysqli_error());
 }
 while($row = mysqli_fetch_assoc($retval))
echo "Device id :{$row['Device Id']}<br>"
          . "Time Stamp :{$row['Time Stamp']}<br>"
            ."Sensor Type :{$row['Sensor Type']}<br>"
            "Sensor Value.{$row['Sensor Value']}<br>"
            ."--------------------------------------<br>"; 
   }
Which Displays the Values From Webpage


You Can Get All the Source Code From My GitHub Repositories

Output :