Saturday, 27 February 2016

Interfacing PushButton and LED to the Raspberry Pi

 LED is Connected to the 16 board Pin
PushButton is Conencted to the 18 pin using 10k Pullup Resistor
Pushbutton is Connected to the 3.3volts power input aka Pin no1(Caution Here)

import RPi.GPIO as GPIO
import time
import sys

GPIO.setmode (GPIO.BOARD)

LED_PIN = 16
Button_PIN = 18

GPIO.setup(LED_PIN,GPIO.OUT)
GPIO.setup(Button_PIN,GPIO.IN)

while True:
    if(GPIO.input(Button_PIN)):
        GPIO.output(LED_PIN,True)
        time.sleep(1)
        GPIO.output(LED_PIN,False)
        time.sleep(1)
    else :
        GPIO.output(LED_PIN,True)


Output :


LED ON and OFF and Brightness Control Via Web interface using Raspberry Pi and Arduino


Raspberry Pi GPIO pins are Unprotected Ones.. So It is Preferred to use Arduino For IO interfacing and Rasperry pi for High Processing Power and Internet Connectivity

In this Project :

I send the Commands from Web Page to to the Raspberry Pi
and Raspberry Pi sends the Commands to the Arduino
according to the Received Command Arduino Will control the State and Brightness of LED
Code for Arduino

void setup(){
Serial.begin(9600);
pinMode(9,OUTPUT);
}

void loop()
{
if(Serial.available())
{
  String inChar = Serial.readString();
if(inChar == "ON")
{
digitalWrite(9,HIGH);
Serial.println("LED is On...");
}else if(inChar == "OFF")
{
digitalWrite(9,LOW);
Serial.println("LED is Off...");
}else if(0 > inChar.toInt() < 1024)
{
  analogWrite(9,inChar.toInt());
  Serial.print("Led Brightness Value\t");
  Serial.println(inChar.toInt());
}
  
}//end of available
}//end of loop


Python Code for the Raspberry Pi
import RPi.GPIO as GPIO
import time
import sys
import serial
from pubnub import Pubnub

ser = serial.Serial('/dev/ttyACM1',9600)

GPIO.setmode (GPIO.BCM)

LED_PIN = 4

GPIO.setup(LED_PIN,GPIO.OUT)


pubnub = Pubnub(publish_key='pub-c-9e022950-208f-49aa-9873-c560add30b41', subscribe_key='sub-c-9ddf7ad2-cfec-11e5-b522-0619f8945a4f')

channel = 'anil'

def _callback(m, channel):
 print(m)
 ser.write(m['led'])

def _error(m):
 print(m)
 
pubnub.subscribe(channels=channel, callback=_callback, error=_error) 
 

  and HTML code is:

 <!doctype html>
<html lang="en">
<head>
 <meta charset="utf-8">
 <title>Getting data from a sensor</title>
 
</head>

<body>
 <header>
  <h1>Control LED from Web Interface</h1>
  <p>ON and OFF and Brightness Control</p>
 </header>

 <section id="main" role="main">
  <button id="ledOn">LED ON!</button>
  <button id="ledOff">LED OFF!</button>

 </section>
 <section>
 <form id="form1">
 Enter the Brightness Value  <input type="text" id="inputValue">
  <input type="submit" value="submit">
 </form>
 </section>
 <footer>
 Done By Kunchala Anil.. Using PubNub Data Streams
 </footer>

 <!-- including the latest PubNub JavaScript SDK -->
 <script src="http://cdn.pubnub.com/pubnub-3.7.1.min.js"></script>
 <script>
(function() {

 // DOM
 var buttonOn = document.querySelector('#ledOn');
 var buttonOff= document.querySelector('#ledOff');
 

 // This is the channel name you are subscribing in remote-led.py
 var channel = 'anil';

 // Init - Get your own keys at admin.pubnub.com
 var p = PUBNUB.init({
  subscribe_key: 'sub-c-9ddf7ad2-cfec-11e5-b522-0619f8945a4f',
  publish_key:   'pub-c-9e022950-208f-49aa-9873-c560add30b41'
 });

 // Sending data
 function sendValue() {
    p.publish({
      channel : channel, 
      message : {led : document.getElementById("inputValue").value}
    });
  }

 function lightOn() {
 p.publish({
  channel : channel,
  message : {led : "ON"}
  });
 }

 function lightOff() {
 p.publish({
  channel : channel,
  message : {led : "OFF"}
  });
 } 

    // Click event
 buttonOn.addEventListener("click",lightOn);
 buttonOff.addEventListener("click",lightOff)
 document.getElementById("form1").addEventListener("submit",sendValue);

})();
 </script>
 
</body>
</html>
 
You can Download The Source Code In My GitHub Repositories Here


OUTPUT :

Monday, 22 February 2016

My First Raspberry Pi IOT Project

The Source of this Project is from PubNub IOT 101 Tutorial.. Which is A Nice one and you can get it from here...

I Slightly modified that Code to add Some Extra Functionality..

Internet Of Things(IOT) is a Vast Concept(I always think it is a Ocean we can swim it all Our lives)..

You have to Know Web designing.. Internet Connectivity apart from the Basic electronics..

When I Attended the IOT Workshop in the India Electronics Week Organized by EFY(Electronics For You...) I am Clueless where I have to start..

i am just A Electronics Beginner Who is Struggling with arduino and Raspberry pi setup...

So Without Knowing Where to start i try to learn some basic HTML Concepts.. and at that time I came across this pubnub 101 tutorial.. So i start tinkering with it..

At My point of View.. You Don't need to master in web designing to start the IOT project..

You can see the Basic Setup in PubNub iot101 Tutorial...

So the HTML code is


 <!doctype html>
<html lang="en">
<head>
    <meta charset="utf-8">
    <meta http-equiv="X-UA-Compatible" content="IE=edge,chrome=1">

    <title>Getting data from a sensor</title>

</head>

<body>
    <header>
        <h1>Control LED from Web Interface</h1>
        <h2>Publishing from web to control a LED</h2>
    </header>

    <section id="main" role="main">
            <button id = "ON">LED on!</button>
            <button id = "OFF">LED Off!</button>
    </section>


    <!-- including the latest PubNub JavaScript SDK -->
    <script src="http://cdn.pubnub.com/pubnub-3.7.1.min.js"></script>
    <script>
(function() {

    // DOM
    var buttonON = document.querySelector('#ON')
    var buttonOFF = document.querySelector('#OFF');

    // This is the channel name you are subscribing in remote-led.py
    var channel = 'disco';

    // Init - Get your own keys at admin.pubnub.com
    var p = PUBNUB.init({
        subscribe_key: 'sub-c-f762fb78-2724-11e4-a4df-02ee2ddab7fe',
        publish_key:   'pub-c-156a6d5f-22bd-4a13-848d-b5b4d4b36695'
    });

    // Sending data
    function disco() {
    p.publish({
      channel : channel,
      message : {led: 1}
    });
  }

     //Sending Off Command
function LEDOFF() {
    p.publish({
    channel : channel,
    message : {led: 2}
});
}

    // Click event
    buttonON.addEventListener('click', disco);
    buttonOFF.addEventListener('click',LEDOFF);

})();
    </script>
  
</body>
</html>


and the Python Code is

## Web-controlled LED

import RPi.GPIO as GPIO
import time
import sys
from pubnub import Pubnub

GPIO.setmode (GPIO.BCM)

LED_PIN = 4

GPIO.setup(LED_PIN,GPIO.OUT)


pubnub = Pubnub(publish_key='pub-c-156a6d5f-22bd-4a13-848d-b5b4d4b36695', subscribe_key='sub-c-f762fb78-2724-11e4-a4df-02ee2ddab7fe')

channel = 'disco'

def _callback(m, channel):
    print(m)
    if m['led'] == 1:
#        for i in range(6):
            GPIO.output(LED_PIN,True)
            print('blink')
    elif m['led'] == 2:
            GPIO.output(LED_PIN,False)
            print('Off')

def _error(m):
    print(m)

pubnub.subscribe(channels=channel, callback=_callback, error=_error)


You can Download the All the Source Code In my Github Repository Here

Output :

Saturday, 6 February 2016

Static IP & Remote Desktop for Raspberry pi

I recently Got Raspberry Pi2 From Crazypi. The Biggest Hurdle I Faced with it is Setting a Static IP via Ethernet and Starting up the Remote Desktop.
So I assume That you have a Monitor For Pi.
Get the Raspbian Jesse Image or Noobs from https://www.raspberrypi.org/downloads/
and Load the OS into the SD card.

Connect the HDMI/Composite cable to the Monitor and Switch On the Monitor.
Connect Keyboard and Mouse to the USB of pi.

Connect the Power supply to the Pi and Switch on the Pi. So you see the RED light is On and Green Light is Flashing.

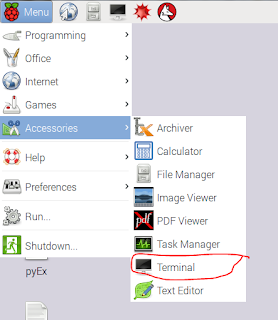
and you get pi desktop like this(I used the raspbean Jesse Disc Image)

Go to the Menu --> Accesories --> Terminal

Type the following Command

sudo ifconfig

and you get
Under eth0 you get the Following
inet addr : XXX.XXX. X .  X  Ip address of your PI
Bcast
and Mask

note Down those values


and then type following in command window

netstat -nr

you get

Note down the gateway Value


By default the Dynamic IP addressing is Set. So we need to change it into the Static

So go to the Terminal And type

sudo nano /etc/network/interfaces

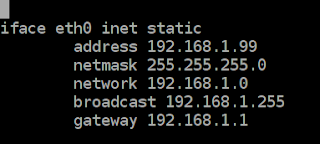
replace line
 iface etho inet manual 

with


change the Values as shown above and cross check them with noted values

and hit control-X and save it then Reboot it using

sudo reboot

once again check the

ifconfig

if the IP Address is Not changes

go to the terminal and type

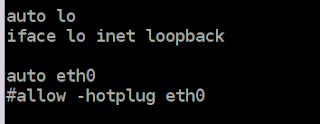
sudo nano /etc/network/interfaces

and  insert following
then reboot again.. you shoud get static ip..

for Remote Monitor

goto the terminal and type the following

sudo apt-get install xrdp

and install the xrdp package.

and reboot your pi.

then Go to your Windows PC/Laptop.
open Command prompt  and enter
      mstsc
or On Search enter Remote Desktop Desktop Connection
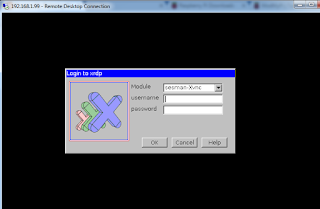
you get

and enter your IP in computer
hit connect

Enter your Username and Password.
and You Get the Pi desktop like this.
If you are facing any problem in this Procedure Leave a Comment or